Share Your School’s Story With Social Media In A New Way
With the 2021 school year in full swing—and most Asia Pacific schools resuming online—it can be even more time consuming and frustrating as an international school marketer to share your school’s story with social media. Usually, you might find yourself trying to persuade teachers to send you photos of classroom activities, or running around the school to gather snippets to post on your streams. Take that effort, mix it with online classes, and it can feel almost impossible to really showcase your school’s competitive advantages—especially if you are trying to captivate and engage your current following and attract new registrations too. After all, the purpose of social media for international schools is two-fold—increase admissions and communicate what’s going on with current families. Unfortunately, it can be hard for school marketers to find the right balance between both—that is until now!
Giving Your Community a Voice
Having worked in an international school as a marketing and communications manager, I completely understand how difficult it can be to try to come up with exciting content while also juggling many other tasks. On one hand, you want to highlight your school’s identity, brand, and competitiveness, while also being light, engaging, consistent, and relevant. On the other hand, you might have hundreds of other things on your to-do list to tackle, events to host, school tours to run, and much more.
Does this sound familiar? Just know that you’re not alone. At IES, we have a solution that we are extremely passionate about! Not only will it help you save tons of time, but it will enable you to tell your school’s story through social media in new ways and from different perspectives!
Class Intercom is a social media management platform that was made specifically for schools. It lets you manage ALL of your posts in one place—Facebook, Instagram, Twitter, LinkedIn, etc. You can easily create, schedule, publish, moderate, respond to, and monitor your handles using their easy-to-use site or app.
While being able to oversee all of your posts in one place is key, what makes Class Intercom impressive is that you can add multiple staff members or students to your account. They can then create posts from wherever they are. Oh, and on top of that, you as the administrator, have the final publishing approval! When you incorporate Class Intercom, you’ll be amazed at the ways you can truly share your school’s story with social media by giving more of your community a voice.
Now, let’s take a look at this social media management tool works and the advantages associated with it.
The Advantages of Class Intercom & How to Use it
When I first heard about Class Intercom and how others could be involved in the content creation process, I thought back to my time as a school marketing manager. If I could’ve had a tool that allowed me to give students and teachers the freedom to create posts for my school’s social media channels but I’d get to approve everything before it went out? I would’ve jumped all over it!
If you’re anything like me—you’re usually double, or even triple checking your content before sending it out to Facebook, Instagram, Twitter, or other streams. That’s why Class Intercom is so great. If you give students, teachers, or even other office staff members access, you get to decide on their particular roles and permissions. For example, you will most likely only give students the authorization to create content and submit it—while moderators (like you) would have the ability to publish what they submit.
So, once someone else creates a post, you can double check the grammar, spelling, messaging—or any other details you want to quickly go over before sending the post out to your followers. How awesome is that!?
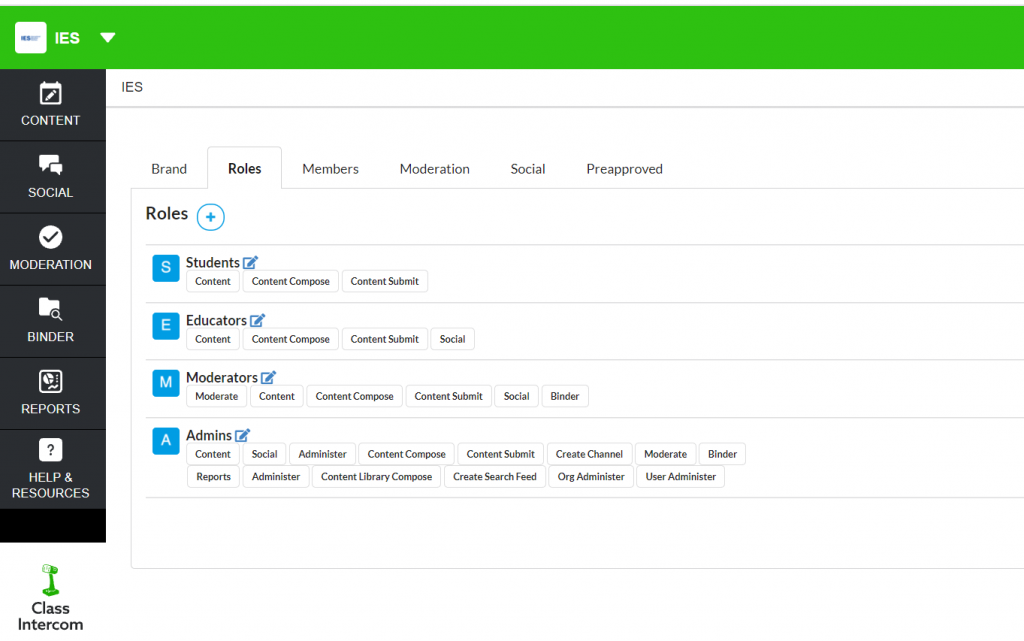
This is the Class Intercom desktop dashboard. You can see in this photo that different ‘roles’ will have different permissions. You even get to choose the labels for the roles, and what each role entails.
Before we take a closer look at how to use Class Intercom, let’s go through some of the benefits.
The Advantages of Class Intercom
From saving you tons of time and effort, to highlighting your school’s community in a whole new light, here are some of the main advantages of adding Class Intercom to your school’s marketing strategy:
✔ Saves you time and effort by having all of your social media posts in one place so you can easily manage everything.
✔ Creates a sense of school pride by involving more staff members and students in the creation process.
✔ Helps teach students about digital citizenship, deadlines, branding, messaging, ownership, social media best practices, and much more!
✔ Teachers and students get to create great, engaging content—they’ll come up with ideas you haven’t even thought about yet!
✔ Your followers will have a much better sense of what’s truly going on at your school on a day-to-day basis.
✔ Helps you easily showcase your school’s competitive advantages and edge over your competitors.
✔ When more people are involved, you’ll constantly have content to share with your community.
✔ You still decide what your followers see. Quickly edit posts, or comment on/provide feedback to others before anything is published. You have the final say.
✔ Your community of followers will become much more engaged with your pages when they see new, fun content created by people they know.
Now that you know some of the advantages, let’s take a closer look at the platform itself as I walk you through the content creation process.
Creating Content To Share Your School’s Story With Class Intercom
Once you—or any of your social media helpers—are logged into the platform, creating content is pretty straightforward. I feel that visuals are a better way of showing the process, so I’ve added some screen grabs to help me highlight how the tool is used.
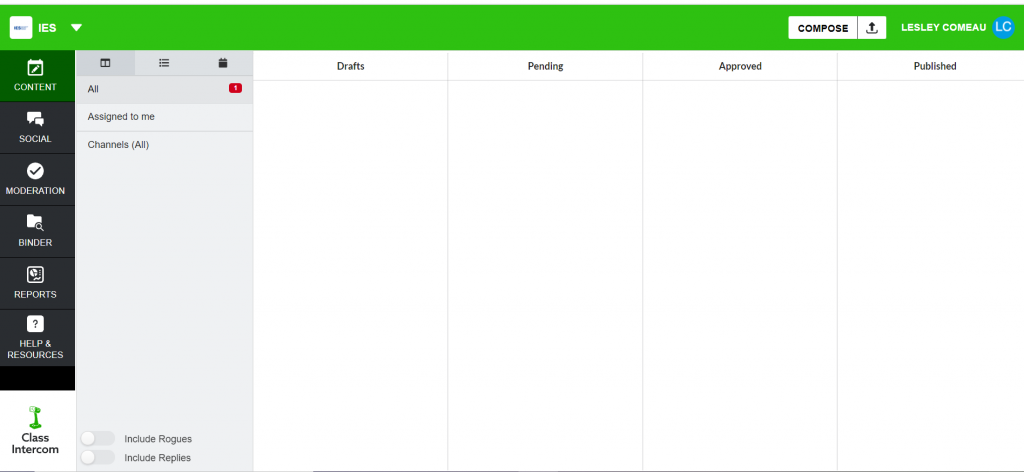
When you first log into the desktop version, you’ll see a screen like this. At the top right corner, you click ‘compose’ to create a post.
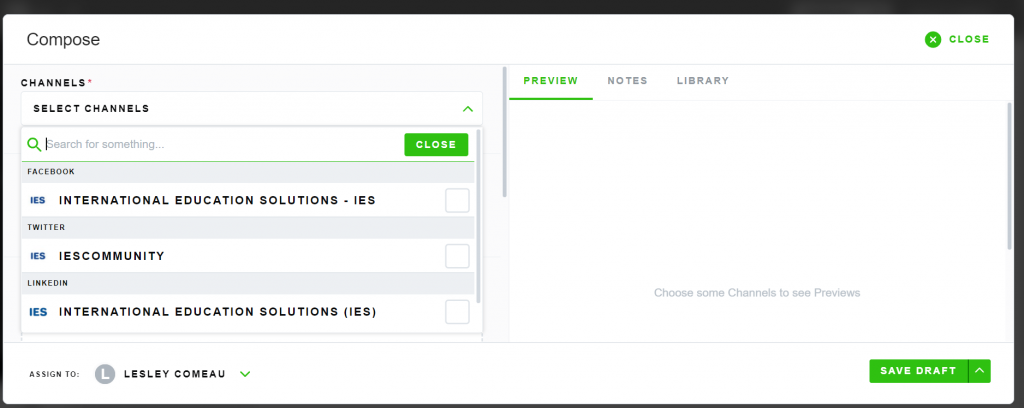
Then, you’ll see a screen like this where you can choose the channel you’d like to post to. Maybe you want your post to go out to multiple channels? You can select as many as you’d like.
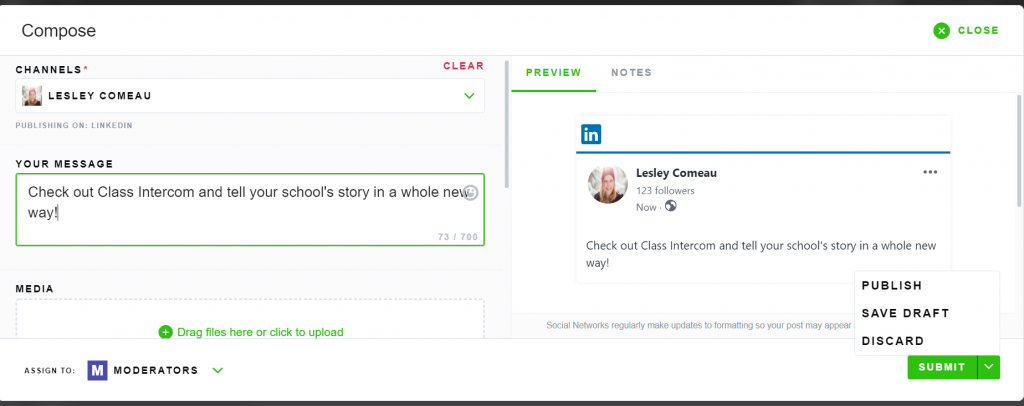
After you’ve selected your channel(s), you’ll see the section called ‘your message’ where you can start typing in text. You’ll also see a ‘preview’ of your post to the right. You can even select any media you want to upload just below the message.
Also note that in the far right bottom corner, you can choose to submit the post as a draft, publish (because I’m admin), or discard.
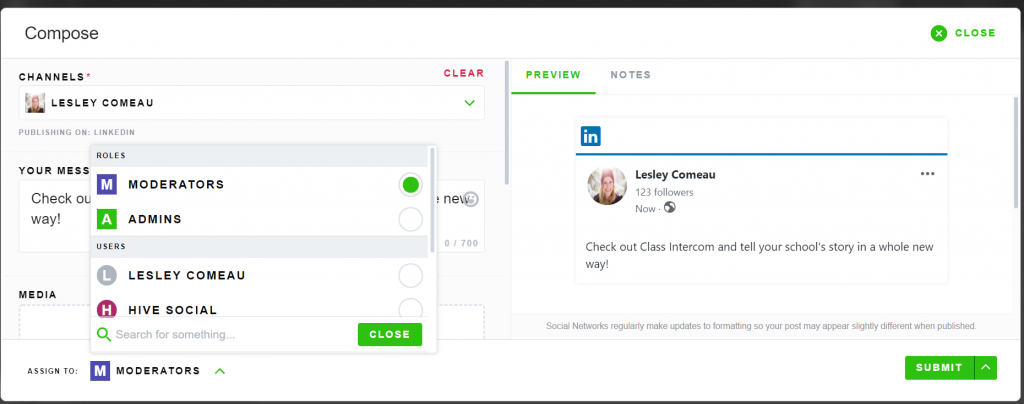
You’ll also notice that in the bottom left corner, you can choose who you are assigning the post to. For example, students who only have content creating permissions would assign it to a moderator—or even a particular person—who could then approve it for publishing.
If you scroll further down on the left side of the post, you have the option to schedule it for another time. I’ve done that in this example.
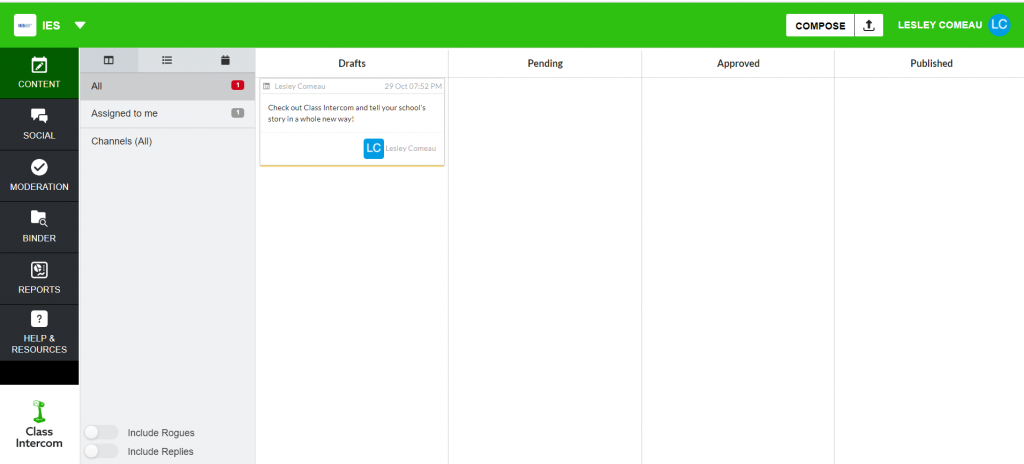
I’ve chosen to save this post as a draft. You can see that reflected now on the main dashboard/home screen. However, if I assigned the post to someone else and clicked ‘submit’, it would show up in the ‘pending’ section as you can see in the next image.
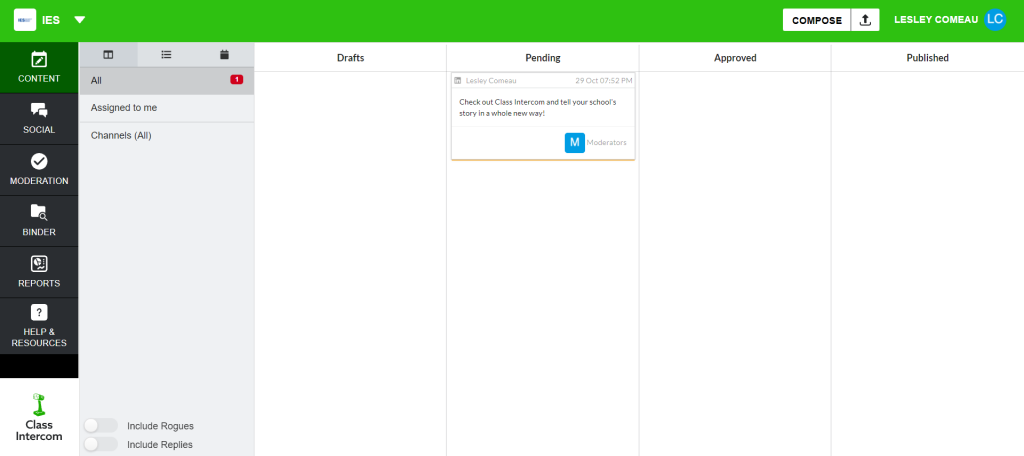
After a post has been submitted to someone with publishing permission, it will appear in the ‘pending’ section on the dashboard. Whoever it has been assigned to will receive a notification that there is a new post that requires their approval.
From there, the assignee (admin/moderator) can go into the post and decide whether or not it’s ready for publishing (next photo).
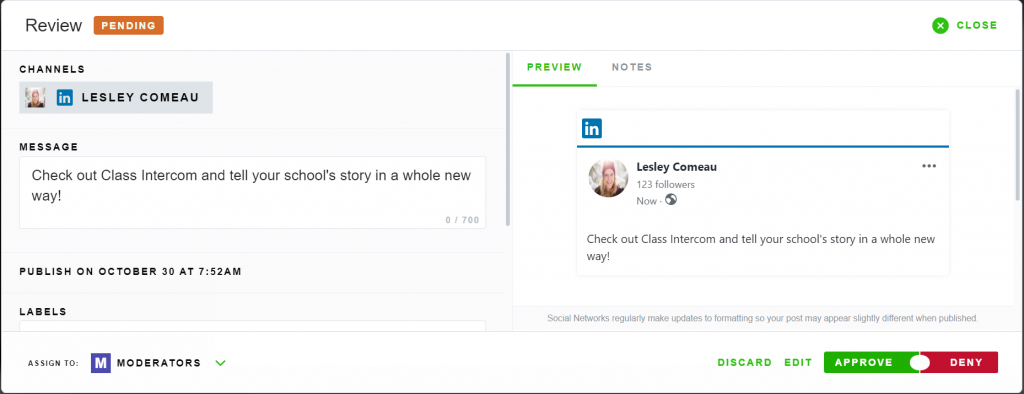
Notice how I can now decide to ‘discard’, ‘edit’, ‘approve’, or ‘deny’ this post? This gives you control of what’s going out to your followers and can help keep your messaging aligned. If I like the post created, I’ll simply approve it. If not, it can be edited first. Or, you can even re-assign it back to the person who created it.
If you go up to the ‘notes’ tab (next to ‘preview’), you can leave some feedback.
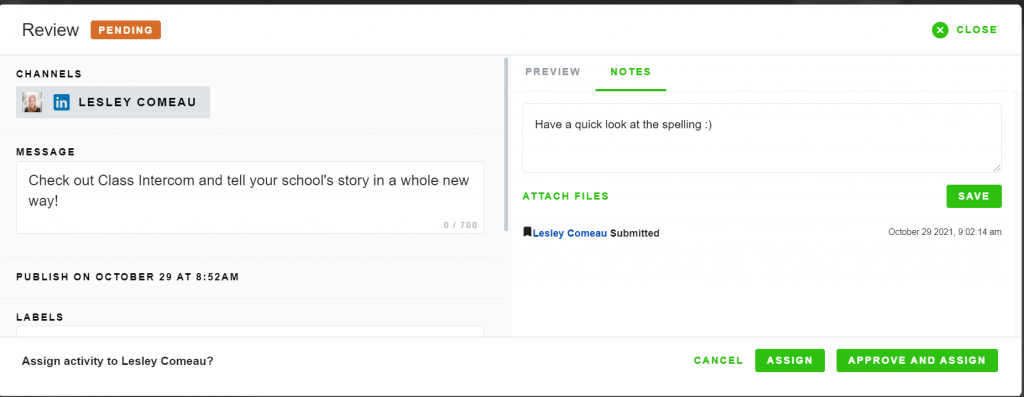
For example, if I wanted Lesley (me) to check the spelling of the post, I would go up to ‘notes’, create a note, go down to the ‘assign to’ section in the bottom left (see photo above), choose ‘Lesley’ from the options, and then select ‘assign’. The post would still remain pending and the author (me) will receive an email notification indicating that they’ve been assigned a post. They can go in and edit the post and re-assign it to the admin/moderator—or particular person to be approved for publishing.
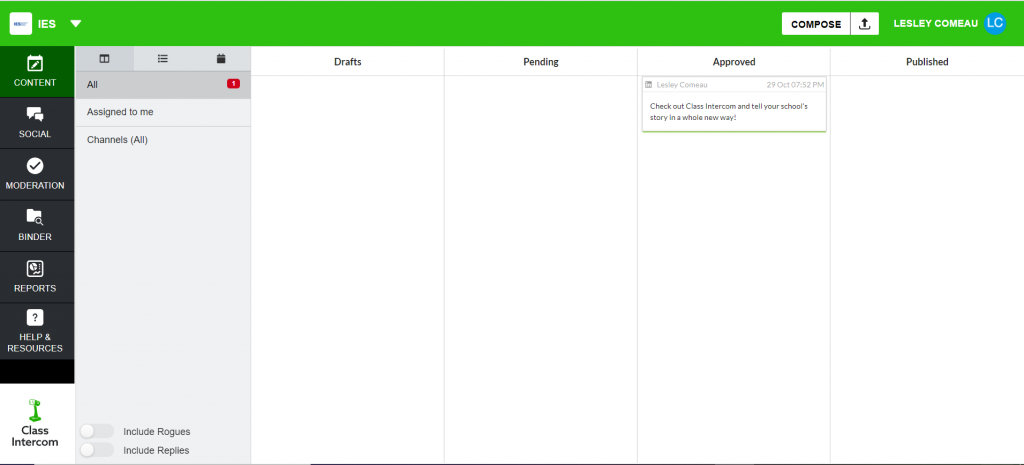
When the post is just the way you want it, you can choose to ‘approve’ it for publishing. If it’s scheduled for a different day or later on, it will show up in the ‘approved’ section of the dashboard. If it was created to go out right away, and has been approved, it will appear in the published tab (next photo).
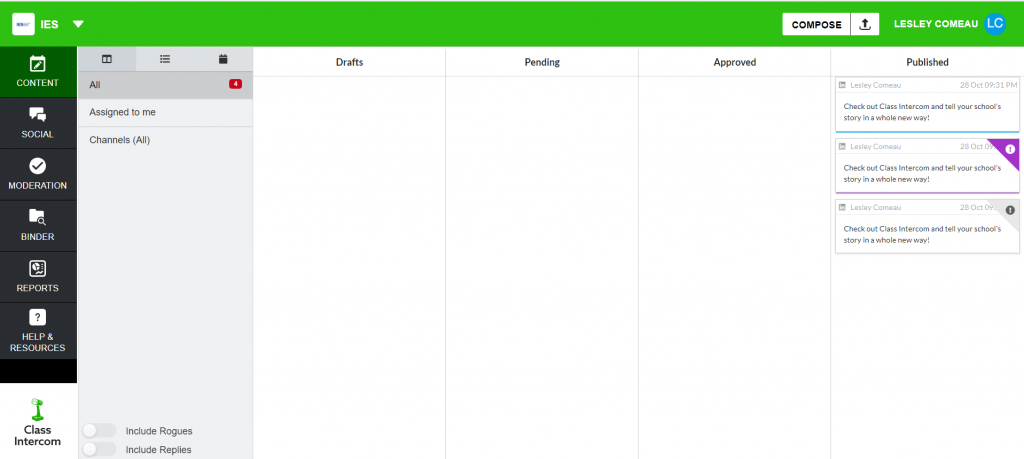
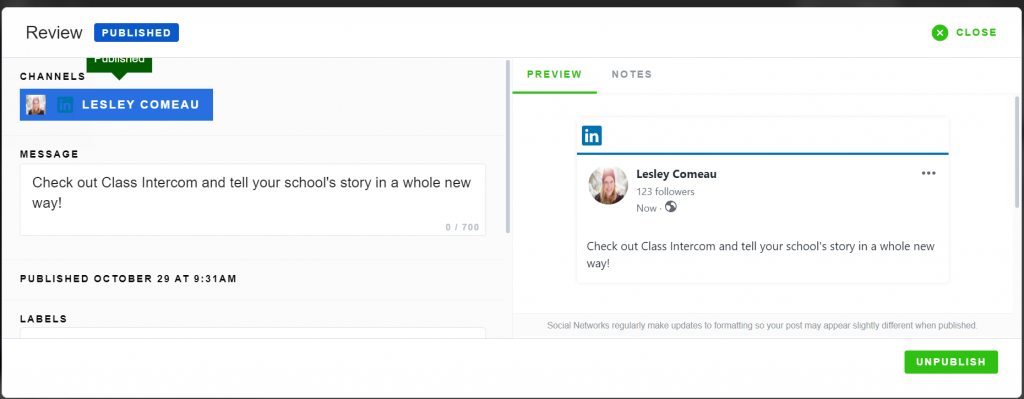
And voila—your post will appear on the social media channel that you selected!
Note: If the post was unsuccessful publishing, you’ll see it in purple and you can try again. If it fails to publish all together, it will show up as grey—as you can see in the third one down.
Of course, like any new technological tool, the best way to learn is to actually go through the motions! It might seem a bit overwhelming now, but it’s a very simple and effective tool to use. Once you get the hang of it, you’ll be a pro!
USING CLASS INTERCOM VIDEO TUTORIAL
What I love the most about Class Intercom is the potential it has to not only help market your school to new students/families, but its ability to show your followers what’s REALLY happening in class, at sports games, on field trips, and so much more! From a school marketing perspective, there are so many ways that you can use this platform to captivate your current followers and attract a whole new audience.
Ideas For Involving Teachers & Students With Class Intercom
There are already many schools that have taken their social media to the next level by using Class Intercom. When I think about all of the opportunities and ways you can use this tool to strengthen your school’s marketing, I get really excited! So, I wanted to highlight just a few of the MANY ways you could apply it at your school:
1. If you have a teacher who is passionate about it, they could start a Social Media Club as one of your after-school options. Students can then learn more about digital citizenship, how to create engaging posts, come up with post ideas, create guidelines, content calendars, and so much more!
2. You could plan ‘takeovers’. Older students (or younger with the help of a parent/teacher) could do a ‘day in the life’ of a [insert school name and grade] student where they show what a typical day looks like for them. When they use Class Intercom to document their day, you can easily approve the posts for publishing as they are added from the comfort of your office!Expand on this idea with a ‘day in the life’ of a teacher, parent volunteer, head of school, or whatever you can think of! If you inform your followers ahead of time, it could create a good amount of buzz for your pages! This is such a good way to show prospective families what it’s like at your school from very interesting viewpoints.
3. Students on sports teams (or coaches) could make posts from away games, tournaments, or practices. When you go to approve the post, you could add at the top of the post [from coach …] , or [from athlete…] so your community knows they created the post personally.If your school celebrates themes like Earth Day/Week, you could have your student social media ambassadors go from class to class and take pictures of what students are doing and post to Class Intercom.For field trips or longer class trips, students and teachers could create posts while off-campus for your community to follow along with.
4. Choose a small group of very passionate students who want to become social media managers or ambassadors. You could train them and show them how to use Class Intercom. Then, you could meet every once in a while to go over engagement numbers, come up with fun ideas, develop a content calendar, assign roles, etc. There are so many opportunities! You could even give these students ‘media passes’ to wear around their necks so that other students know they’re the school’s social media team and are taking pictures for the school’s pages.
You could give students different responsibilities or titles. Maybe someone is a good writer? They could be the ‘editor’ or ‘copywriter’. Or, perhaps someone is very artistic? They could come up with design templates that the other students use for particular posts.
5. The students who are content creators might think of ideas like interviewing their teachers, Throwback Thursday where they compare where the school was to where it is now, polls for the community to vote on, or other engaging suggestions. The concepts they come up with might be extremely beneficial to your marketing. By giving others in your school the opportunity and freedom to create, you might be surprised by what they come up with!
Start Using Class Intercom For Your School
When discussing the numerous possibilities of Class Intercom with school marketers and communications personnel, they are encouraged by all of the ways they can use it to help them. As mentioned earlier, there are plenty of benefits, but the main advantage is that you can tell your school’s story in a more engaging way—all while showcasing your curriculum, campus, and enthusiastic community.
The key is to start small. I suggest trialing Class Intercom with a few people you know you can count on first to see how the content and approval process goes—and then scale as you see fit!
Are you interested in using Class Intercom at your school? At Hive Social, we have the exclusive licensor rights to the platform and would be happy to discuss it further with you! We also incorporate Class Intercom into all of our school marketing consultancy packages and would love to tailor one to fit your school’s marketing needs. Get in touch with us today via email at hivesocial@ies.network, or schedule a free 20-minute consultation with us using this link: calendarhero.to/hivesocial
If you’d like to learn more about it, check out Class Intercom’s website to discover how other schools are effectively using the platform. Additionally, you can watch this video tutorial to learn more.
Author: Lesley Comeau
Hive Social Manager, Asia Pacific


